Showing posts with label Crop Shop. Show all posts

Wednesday, January 19, 2011

Winter Bo Bunny Layout

I created this layout for a design team assignment for my local scrap store called the Crop Shop. My assignment was to use Bo Bunny's Midnight Frost Line. Love, Love, Love Bo Bunny and this line rocks!


Bo Bunny’s Blog has sketch contests so I visited the site and decided to play along.


Took my photo into Photoshop and converted to black & white then applied a duotone effect of black and light blue.

More snow is on its way so I am sure there will be more winter scrapping in my future :)


Thanks for stopping by!

Wednesday, November 3, 2010

Dad’s Birthday Layout

I just finished this layout using Little Yellow Bicycle papers. This was an assignment from my local scrapbook Store - The Crop Shop. (sorry - photos are not the greatest!)


We had a wonderful visit from our nieces & great niece (my sons’ godmoms and cousin) during our summer vacation. They came down to the beach for the day on my husband’s birthday. I did this page to capture the memory.

I’m off to a Friday/Saturday Crop this weekend - can’t wait!
Thanks for stopping by!

Friday, July 30, 2010

Beach Bums Layout

I did this layout for my local scrap store, The Crop Shop, design team assignment. It uses Cosmo Cricket DeLovely line. Love the bright colors of these papers. I cut circles and used foam tape to bump them off the page a bit.


I used a sketch from a fellow Creative Charms design team member, Debbie Gaydos. Love her sketches - I pull them out everytime I do a page. Check out her sketches here on the Ally Scraps blog. Here’s a link to Debbie’s blog - she is very talented and love her style!


Thanks for stopping by!
Amy

Sunday, May 23, 2010

Bo Bunny Mom's Day Layout

When Cathy from the Crop Shop gave me my design team assignment I could not wait to get my hands on the Bo Bunny Jazmyne line. I follow the Bo Bunny blog and I've been admiring the awesome projects created with Jazmyne.

Bo Bunny has a sketch challenge. It is a two pager that I adapted to a single page layout.


I used a variety of Jazmyne, and Bo Bunny Dot. I stitched the background square and around the scalloped edges. I don’t usually use the stickers for titles but loved the colors and style of this one.


This page is all about my great Mom’s Day. I got lots of homemade goodies that I will treasure forever. My oldest son had a celebration for Mom’s at his Kindergarten class. I almost went through a whole box of Kleenex! I am so lucky to be a Mom :)

Sunday, April 4, 2010

Easter Layout

Happy Easter Everyone!

I did this layout for the Crop Shop, my local scrapbook store. I was assigned the Best Creations line for this design team assignment. Love the two sided papers. I cut the title from George and used a light blue cardstock.


I have two boys so I thought the blue ribbon and blue Stickles throughout the layout would make it a bit more “boyish”.


I bought my boys some cute golf shirts for Easter and can’t wait to snap some photos and insert them into this layout.

Have a Happy Blessed Easter!


Wednesday, February 24, 2010

Bo Bunny Abbey Road Layout

I received my design team assignment from my local scrapbook store, The Crop Shop. Bo Bunny - Abbey Road. I love Bo Bunny and checked out the line on their site. I discovered the Bo Bunny blog that features awesome projects and challenges.

Here is a Sketch Challenge taking place:


Here is my Abbey Road Layout:

~ LEFT SIDE ~


~ RIGHT SIDE ~


~ CLOSE UPS ~


Circle elements are from Accent Essentials and font is Plantin Schoolbook.
Embellishments from Creative Charms.

Stop by tomorrow for details on the Origami Flowers.
I tried these for the first time on this layout and now I am hooked!

Thursday, January 21, 2010

SNOW Layout

Here is a layout I did for my local Scrap Book Store, The Crop Shop. I'm on the design team and the assignment was papers from TPC (The Paper Company) Studio. The papers were wonderful. I used Let It Snow, Flurries & Swirl. This layout also features Winter Blues Sticker Sheet. I also used Core'dinations Navy and a Gray Card Stock.

I am also submitting this layout for the Fussy & Fancy Friday Challenge - Winter Theme.


This layout features silver and blue inking. I wasn't sure how the ink would work on the stickers but they worked great. The SNOW type is from the sticker sheets.

I did a bunch of layering on the SNOW title - here is a closeup of all the layers and a close up of the final title.


Thanks for stopping by!

Wednesday, December 9, 2009

Christmas Layout - 2 Page Spread

I layed out this two page spread for my design team challenge for the Crop Shop. I used Reminisce Santa's Workshop papers.


It features a shaker box on the bottom so you can shake and see all the cute patterns from the backs of the paper. I used the clear plastic cover that came with my ruler packaging. I adhered it to the layout and added some ribbon as trim.

Monday, November 23, 2009

In Their Words

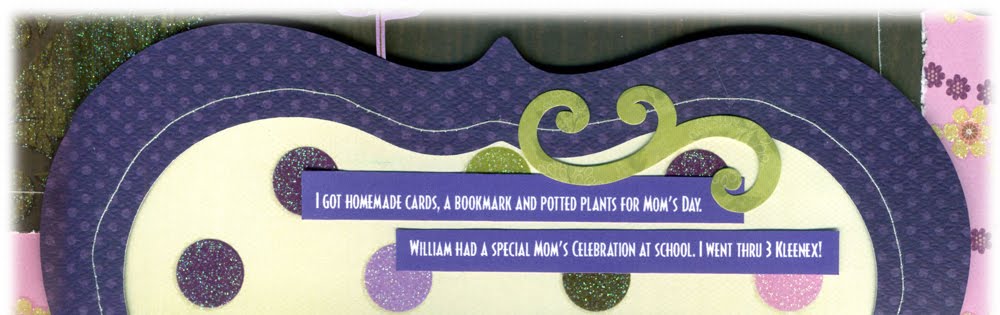
My boys have some fantastic quotes and questions and wanted to capture them on this layout. I'm on the design team for a local scrapbook store called the Crop Shop and the challenge was to use Core'dinations Chocolate Paper. I really liked how sanding the embossed elements look with paper but I do not have an embossing gadget. I remember doing hand embossing in art school, did a test and worked like a charm!

Here is my final layout:

Here is the quote SVG if you'd like to give this a try. Click here to DOWNLOAD.

Here is tutorial on how I did the hand embossing:
STEP 1: After you create your image in Illustrator select art and choose reflect tool. (Please note - do not do real detailed art - keep it on the simple side)

STEP 2: Select Vertical Reflect and Copy.

STEP 3: Print the reflected art out on your printer.


STEP 4:
Cut the original art out on the Cricut using chip board. (I use cereal boxes - and set cutter to 3X in SCAL)
STEP 5: Attach chip board to the right side of the paper (the side you want to "pop out"). Place in the corner for easy positioning & tape in place.

STEP 6: Trim the mirror image that you printed out to size.

STEP 7: Turn paper over and attach mirror image to same corner. This printout is just a guide to show you where you need to emboss.

STEP 8: I just used a pen without the point. Using your printout as a guide you have to feel for the edges of chipboard and trace around and also emboss on the inside of the object. Press hard but don't tear thru.

STEP 9: 
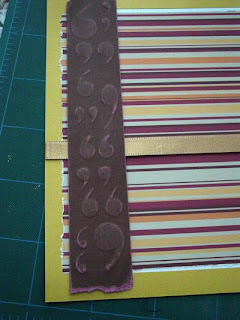
This is how it should look from the bottom side of the paper.

STEP 10: This is the final embossed panel. I tore the top and bottom and sanded on my embossed areas to reveal the core color.

This paper is awesome. I also used it for the title and frames around the quotes and printed the quotes out on the back of the paper. Please let me know what you think of the tutorial, hope you give it a try!