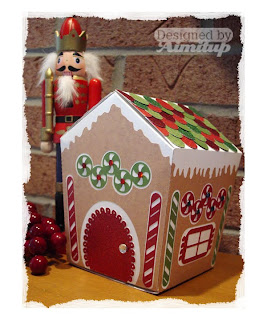
I went out to lunch the other day and spotted this cool box that resembled a house. I asked the waiter for one and brought it home. I put it on my scanner, traced in Illustrator, designed the color layers in Illustrator, cut on my Expression and assembled.
Here it is! My first 3-D type project:
Here is a step by step tutorial on the project. Please note: I am on a Mac so these are saved in SCAL 1. I've included width and height measurements incase you'd like to play with the svg files and customize before cutting.
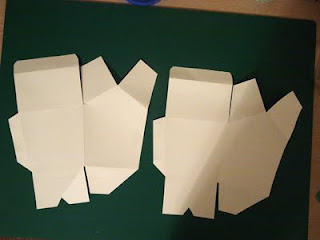
STEP 1 - Cut "GingerBrdHouse_White.svg" 2 times (white cardstock).
w: 10.867 h :11.350 If you are new to SCAL and cutting the dashed lines will help in folding the piece.
 STEP 2
 - Cut "GingerBrdHouse_Brown.svg" 2 times
w: 10.100 h: 8.598 Adhere brown stock to white.
 STEP 3
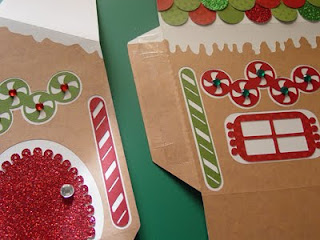
 - Cut "GingerBrdHouse_RoofTiles.svg"
w: 8.676 h: 10.878. I put some separation between the circles so you can do 5 different strips of color on your mat. You will need 78 circles - if you cut as is you'll get 100 for some extras. Layer these circles as shown in the photos below. Add a pencil line to help align straight. This is the time consuming part but well worth it.

Trim off the circles that overlay the edge.
 STEP 4
 - Cut "GingerBrdHouse_Green.svg" 2 times (or copy and paste)
w: 5.855 h: 3.028 and adhere to house.
 STEP 5
 - Cut "GingerBrdHouse_Red.svg" 2 times (or copy and paste)
w: 7.700 h: 3.897 and adhere to house. I did not have enough red glitter stock so I cut one set using glitter paper and one using Bo Bunny Dots paper. Add some embellishments. I used
Creative Charms gradient jewels and a brad for the door knob.
 STEP 6 -
 Adhere two house pieces together using double stick tape.
Final flat view.
 STEP 7
 - Fold in the small top flaps first and then tuck in the other flaps.

View from the top.
 STEP 8
 - Fold in the small bottom flaps in and then fold in the interlocking flaps. You can add some double stick tape to the panels.
 STEP 9
 - One design flaw...your brown edges near the fold may be lifting a bit. Just use a glue pen to get under there and adhere.

Here is an inside view of the final product. A pair of gloves and a gingerbread ornament fit nicely. This would also be great for cookies or some homemade candy. I plan to cut out some plain boxes for my boys and let them decorate.

For the SVGs please click here to
DOWNLOAD.
For the SCUT files please click here to
DOWNLOAD.
Would love to see your house if you decide to create this!