Showing posts with label SVG Cuts. Show all posts

Monday, September 24, 2018

Giveaway Winners & Witch Hats & Another Giveaway!

Thanks to everyone who entered my giveaway! 
I'm going to give each of you a $10 voucher! Woo Hoo! I'll be in touch with the details.


Today I'm sharing some Witch Hats I created. 


I used the Miss Kate Cuttables Oct 31st Paper Pack to create these.


Here's a closer look at each hat.


This 3D hat opens up so you can stash some tasty treats in side.
The file is from SVG Cuts ~ Gimme Candy Boxes SVG Kit.

Please note - I added a coaster in between each layer of the brim of the hat - not really needed but I had a bunch in my stash :)

I made some of these a few years back in 2012 - here's a link to my blog post.
Really love the fun and colorful paper for this year's creations!


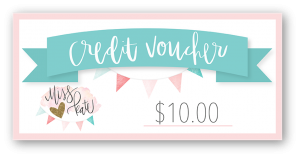
I have one more $10 Miss Kate Cuttables Voucher to give away!
Leave me a comment WITH YOUR EMAIL by Sunday Sept 30th and I'll announce the winner on Monday, Oct 1st!


Wednesday, December 21, 2016

Vintage Truck Box Card & JOY Sign

Hello Everyone! Hope your holiday projects are coming along!
I recently purchased an amazing kit from SVG Cuts.


I made 7, Yes SEVEN! Vintage Truck Box Cards for my sons' teachers.
They were so easy to put together and when I showed my boys they said "WOW!"
If you aren't familiar with Box Cards - they fold up and fit perfectly in an envelope.


I look forward to making some of the other elements from the kit.


I have another project to share with you today. I have a friend, well more like a sister, (my sister-in-law's sister) who just got a Cameo. I gave her a few basic lessons and she created this fabulous JOY sign for me on reclaimed wood. I absolutely love it and had to share with you!


See you on Friday. I'll be sharing a Miss Kate project!


Friday, December 9, 2016

Holiday Craftiness

Hello all! Welcome to my blog!
Today I'm sharing some holiday projects. 


Here is a paper project I created. The file is from SVG Cuts - Santa's Sweets SVG Kit.
It was so fun to put together and will look amazing on my cookie table at my holiday parties.
I picked up the stand at Target in the dollar spot. I'm thinking it may need some vinyl to personalize it.


I also had some fun with my sewing machine. I created these mug rugs! It's a little quilted rectangle to hold our coffee, tea or in my case hot chocolate mug.


I used 2 1/2" inch squares for the sides. I cut some fabric with my cameo to accent the mug rugs. I just ironed on some fusible web, added the fabric to the Cameo mat and cut away. 


The SVGs are from Miss Kate. I used elements from the Ho Ho Ho Title, Elf Shoe Set,  
(I am not sure where I got the house from - forgot to make a note of the file!)


Hope you liked my holiday projects and hope your holiday cookies, shopping, decorating and crafting is coming together nicely!

Stop by on Sunday to check out my Miss Kate Design team project.


Wednesday, June 8, 2016

Thank You Cards

Hello! I haven't blogged in awhile. The last few weeks of school are always a bit hectic but also fun.

I snagged this awesome FREEBIE from SVG Cuts awhile back and created these Thank You Cards for the teachers.


I made the color scheme match the school colors.
One thing I did do to alter the initial design is select all the elements and create an offset. I cut in the lighter blue card stock.
It helps with placement of the cuts and adds another layer.

If you don't already have this freebie stop on over and pick it up!


Thanks for stopping by today!

Monday, February 15, 2016

Tulip Box Card

Hello Everyone! If you follow along you saw the box card I created on my last post. 

I purchased the Springtime Box Card SVG KIt from SVG Cuts and have to say I'm officially hooked on box cards!
Here is a look at the box card in the envelope.


When you pull out the card it is flat and here's how it looks.


Now for the big reveal....It pops open and WOW a 3D card.
(Even my boys and husband were impressed by this one...lol)


Here's a few more looks - looking down and the back. I used the pen tool to add a Birthday Message.


I switched up Mary at SVG Cut's card a bit. It was originally designed to have all the tulips at the same level.


I staggered them. Thought I'd share how I did it in the Silhouette Designer Edition Software.

STEP 1 - Open the SVG files for the 1st and 2nd set of tulips.

STEP 2 - Draw boxes to remove some of the stems - see red boxes highlighted below.

STEP 3 - Select Subtract under the Modify menu. It will delete the area you selected.

STEP 4 - Move the tulips and stems down to overlap the bottom strips.

STEP 5 - I outlined the images to show you how if you were to cut them now it would cut them separately.
Here is the tricky part....1) Select the bottom strips and hit ungroup. Select just the strip and the flowers/stems above it and select Weld.
(If you select the entire thing the numbers and fold marks would disappear) 

STEP 6 - If you select Cut Line Settings and select "Cut" this is how it should appear.
You are now ready to cut!


Hope you liked my box card and the tutorial. 
If you have any questions about the tutorial please leave me a comment or send me an email at am220099@gmail.com.

Saturday, February 13, 2016

Love Box Card


Happy Valentine's Day to you! I created this fun box card today and wanted to share with you.
I was inspired by three different people on this project.

First Cindy Ruffino created a box card using Miss Kate Cuttables files - Second Melissa De Monic created the card with the heart balloons using the pen tool:


Last But Not Least - Mary from SVG Cuts created these new Springtime Box Cards SVG Kit. I purchased the Kit and watched the Assembly Video. I thought ....I'm going to try and make my own Valentine box card before I make Mary's Spring versions.


Thanks ladies for the inspiration!


I added the Heart Balloons & Love Word Set from Miss Kate Cuttables.
As I mentioned earlier I used my pen tool for the outline and added the cut outs of the hearts. 

As you can see the amazing part of a box card is they fold flat and once the recipient removes them from the envelope >>>
BAM! it is a 3D Card.


I also used my pen toll to create the messaging on the back of the card. 
(She is going to love it and so will our other Grandma!)


Happy Valentine's Day!

p.s. if you want to pick up SVG Cut's latest Springtime Box Cards SVG Kit
Just click away.


Friday, July 3, 2015

Wedding Invitation Shadow Boxes

Hello, It's been awhile since I blogged. Life has been busy and we spent a wonderful week at the beach (lots of great beach photos to scrap!)

Hope you are having a great day today and Fourth of July Weekend.

It is wedding season and I have a few wedding shadow boxes to share today. These make great gifts for wedding showers or for the wedding. You could also display at the wedding on a nice stand.

My first one was a wedding featuring light purple roses and gerber daisies. 
((Click on the image - get a closer look is well worth the click!))


I used the 3D Rose flowers from SVG Cuts’ Crush On You Boxes SVG Kit.
The other flowers are from 3D Flowers SVG Kit.
There are great tutorials showing how to assemble.


I used my go to most favorite bracket for this one. It’s from SVG Cuts’ Memory Garden Designer Page SVG Kit.


The second wedding theme was all about rustic. Burlap, Babies Breath, and Neutral Colors.


They had a K + G theme going throughout so I matched the K + G and cut it on my Cameo using white heat transfer vinyl. 
I then ironed it on the burlap to create a border across the bottom.

Here’s a closer look:


These two wedding themes were completely different - that’s what makes a customized gift perfect!

Thanks for stopping by today.