Showing posts with label Tip. Show all posts

Saturday, June 18, 2011

Tip of the Week - Shadows In SCAL


Kim sent me an email and asked me how I created the shadow for my Dad's Day Candy Bar Wrapper. It is the shadow I cut in cream card stock. So here's a tutorial on how to do it!

Step 1 - Import both SVG Cuts files. You can get them free from here.

Step 2 - Click on each image and hit break apart. Delete the "a" from the top one and the "R" from the bottom image.

Step 3 - Select the bottom image and move it up on top of the upper image. Select both images by drawing a box around both. Then select WELD.

Step 4 - Select Shadow - Pointy - 2.0. It will look strange but...


Step 5 - ...Hit Preview and you will see the final cut.


Cut Away! Hope this helps Kim and others. Have a great weekend.

Sunday, May 29, 2011

Tip of the Week - Make your own embossing folder


Well - I have been wanted to do this for quite some time and finally did it! I must admit it took me a few times to get it right. I used the Cricut Embossing Folder Kit.

Step 1 - I set up the SVGs I wanted to use as my emboss. I used all “thank you” files from SVG Cuts. The embossing folder is 5.75 wide x 4.25 high and I came in about a 1/2 inch in from the edge.

Step 2 - Place the Cricut Embossing Sheet on the Cricut Mat and cut 2 times.

Step 3 - Peel off the entire sheet as one piece - a little tricky but it worked out for me.

Step 4 - Now here is the part I struggled with - I was peeling off the entire one side but you only peel off the negative area so that side is sticky and place the entire sheet on the left side of the blank embossing folder. Press this down firmly - they even recommend you run it thru the Cuttlebug to make sure it is sticking.


Step 5 - Take the backing off the positive side. When all done fold the folder up so those pieces adhere to the right side of the embossing folder.


Step 6 - Emboss away!

Here is a card I made with the “thank you” embossing folder. I've embossed using this about 20 times and it is still staying intact.


I used DCWV & AC Cardstock and Creative Charms Gradient Pearls along with a ribbon to accent.

If you decide to make your own embossing folder or if you have already done so please email me a photo - would love to share!

Hope you are enjoying your Memorial Day Weekend!

Tuesday, May 10, 2011

Tip of the Week - Photoshop


I created this Fall layout for the recent Creative Charms Blog Hop. I am not usually overly concerned and don't usually try to match my photos to the papers I pick out but on this one - they really clashed. So after creating the layout I am going to reprint my photos using a duotone effect in Photoshop. Thought I would share how to do this.
Step 1 - Open up your photo in Photoshop

Step 2 - Under Image/Mode Select Grayscale

Step 3 - Go back to Image/Mode and Select Duotone

Step 4 - It will bring up a box. I kept mine black and for my second color I picked a gold color. You change the color by clicking on the square of color. Play around with different options until you find a good color combination.


Here is my layout with the duotone photos in place:


Gives it a whole different look for sure! All the cuts on the page are from SVG Cuts and Embellishments from Creative Charms. Thanks for stopping by.

Thursday, May 5, 2011

Tip of the Week - You Can Change


This SVG is a freebie from 12/8/10 from SVG Cuts. I liked the owl but did not like the stern look on his face and did not need the scarf, branch or claws. I wanted a more “cutesy” owl for my Family Collage. So I made a few changes in SCAL (Sure Cuts Alot) and here is what I came up with:


Here is how I took the stern owl and made him cute:

Step 1 - Import the file called "brown.svg" and "darkbrown.svg". Other files are not needed.

Step 2 - Select the brown elements on the right and hit break apart. Then select & delete the cut out of the eyes and the claws.

Step 3 - Now you have all the elements you need. You just have to add some circles for the eyes using basic shapes.


Here is my final collage. You can see all the details on the SVG Cuts Site - under Amy’s Corner.


And here are a few closeups for your viewing pleasure :)


Hope this gives you some insight into making slight changes to suit your needs!


Tuesday, April 26, 2011

Tip Tuesday - Welding

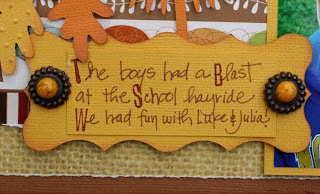
Welcome to the second edition of Tip Tuesday. (woo-hoo 2 weeks in a row!) Here is a sneak peek at a journaling box I made for the upcoming Creative Charms Blog Hop Project. I combined/welded two SVGs for this.


Step 1
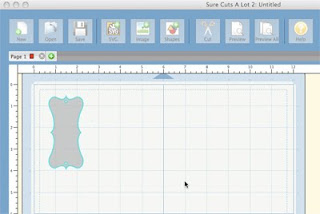
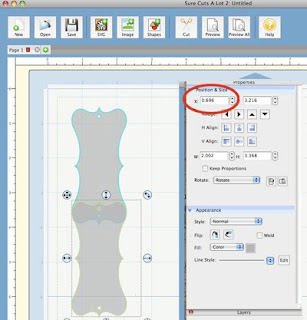
Import your SVG into SCAL. I used the scallop shape from Edisto Island Cards - Oak Manor Step Card - "label_top.svg" Make note of the X & Y Coordinates under the Properties box.


Step 2
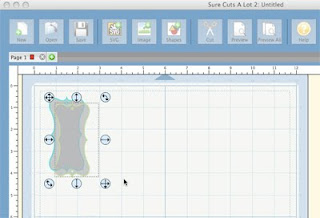
Click on the image and copy & paste it. and drag it down so the middles overlap.


Step 3
Now you can just sorta eye ball this or you if you want to get exact make sure you have the second image selected and enter the same X coordinate as the first image you placed. This will line them up perfectly.


Step 4
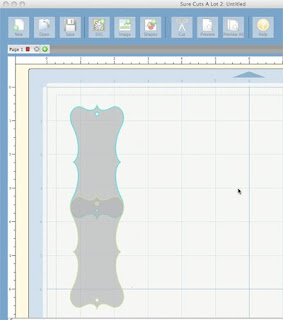
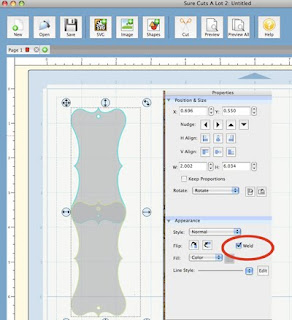
Select both images and click on Weld under the Properties box.


Step 5
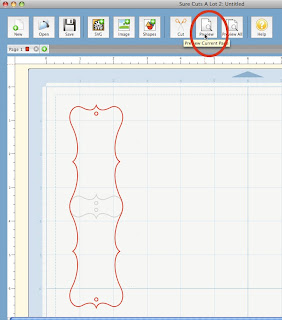
Click Preview to ensure it works!


Hope that helps if you are new to SCAL!

Tuesday, April 19, 2011

Tip Tuesday - Resizing in SCAL

I know there are a lot of new SCAL users out there and seems like a lot more questions are popping up. So I decided to do Tip Tuesday. Stop back every Tuesday (I hope) for tips on SCAL, Scrapbooking, Crafting, etc.

Someone asked about sizing two layered SVGs on the SVG Cuts Forum and here is how I do it:

Step 1
Import your bottom & top layer SVGs into SCAL.


Step 2
Click on both images while holding down the shift key. Continue to hold down on the shift key and click on the bottom right icon and drag to the size you would like.


Step 3
Now you have two SVGs that are both sized up proportionately. You can now copy and paste more of them if you like.


Please note: Another way to resize is to use the Width & Height box within the Properties box. Make "Keep Proportions" is checked when you enter in your new width/height. You can either click on each image separately and resize or for a short cut you can select both together and resize.


As you can see there are many different ways to do things in SCAL or any program - just sharing how I do things :)

Thursday, February 3, 2011

Not Just for Cupcakes!


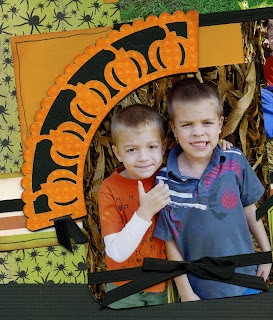
Hello everyone - I did this pumpkin patch page at a recent Friday nite crop.

I used elements from the SVG Cuts Fall Cider Cupcake Wrappers Collection. The pumpkins & little barn worked perfect for our trip to the pumpkin patch. I added a ribbon to the end of the cupcake wrapper and also added ribbon throughout the layout.

I have a tip to share with you...

Photomerge

One of the artists at work told me about a great feature in Photoshop. Of course scanners can not scan an entire 12x12 page so I have to scan in two sections and merge in Photoshop. Well this new trick I learned is not only fast - it is also perfect!

1) Open one of the scans
2) Go to File/Automate/Photomerge
3) Make sure Auto is selected
4) Click Browse and select both files that you want to merge then click OK
It will automatically merge the two photos (see below how it selects the best place to merge)


Give it a try! And don't forget Cupcake SVGs are not just for Cupcakes!