Showing posts with label Vinyl. Show all posts

Tuesday, April 9, 2019

New Release & Giveaway

 Spring has sprung at Miss Kate Cuttables.
The flowers are in bloom and the days are longer.
Bunnies, baskets, chicks and eggs
are all signs that Easter is upon us.

Miss Kate Cuttables has a new Easter line of
 paper packs and die cuts.
These newly designed Easter papers and
 die cuts includes all things Easter.
 Featuring baskets, flowers, 
sweet little chicks and bunnies,
 all in bright and airy colors.

The Miss Kate Cuttables design team will showcase
this paper pack for the next 3 days.


You can find the digital version of the 
Easter Fun Paper Collection HERE.

Or, you can find the physical version
HERE on Amazon. 

Easter Fun Die Cut Pack

You can find the matching
 Easter Fun Die Cut Pack HERE.

Here's my first project:

I created a wooden sign using the Easter Title Banner for my project. 
I took a 9.25" x 24" board and stained it. Next I added a dry brush coat of white chalk paint.

I then cut the Easter Title Banner 
out of vinyl and applied to my sign.
I then painted with yellow chalk paint. 
After some dry time I removed the vinyl stencil.

I cut the eggs from the Easter Fun Paper Collection and 
EASTER from the Easter Title Banner  in brown paper. 
I inked the edges of the patterned paper.

This next step is a game changer for me! 
I applied a thin layer of modge podge on the back of my paper 
and applied to my sign. I finished off with some button accents. 
This is the first time I added paper to a wood sign 
and it worked perfect!

For my second project I created a two page Easter Layout:

I used the Easter Fun Die Cut Pack. 

For the right side of my layout I cut a large Geometric Easter Egg 
and added papers behind it from the Easter Fun Paper Collection.

Hope you liked my projects! 


Please visit each of the design team
blogs linked below for all the
 details on their projects.

Sherri's Blog
Cathie's Blog

Miss Kate has generously offered each
design team member a pack of the
 Easter Fun Paper Collection and matching
Easter Fun Die Cuts to giveaway on their blogs.

All you need to do to enter is...

1) Follow my blog and comment below before 4/15.
2) Follow the Miss Kate Cuttables Blog
3) For additional opportunities follow and comment on each design team member's blog:
Sherri's Blog
Cathie's Blog

Please check out the Miss Kate Cuttables blog tomorrow
for more inspiration from the other design team members.


Monday, March 18, 2019

Easter Decor

It's my turn on the Miss Kate Cuttables Blog today and I'm sharing a fun Easter Decor project. Who's ready for Spring? I AM!

Before we check out my project don't forget to grab the Freebie of the Day from the Miss Kate Cuttables Website.

Here's my Easter Decor Project:


First thing I did was paint my wooden round. I have been wanting to try the buffalo plaid style for a really long time and finally gave it a try! (Search YouTube for tutorials)
Here's a look at my plaid pattern:


I then planned out my wording and the leaf accents...I wanted to keep them simple.
I used just the "Easter" portion from this Easter Title.

I used the only the green leaf layer from this Spring Wreath SVG.

I placed just the elements I wanted to use in my cameo software and placed the Easter on top of the wreath and subtracted the wreath so they would not overlap. I cut this from vinyl, applied it to the sign and used chalk paint and a foam brush to add the green and pink. 

Since the background pattern was a bit busy I was not happy with the contrast of the Easter and leaves in the wreath. I first decided to do a solid fine point sharpie around the elements then decided to do a line/dot pattern. It's a bit less forgiving and I like the look. 
Here's my work in progress...


I experimented at the top of my sign where I knew my flower and bow would cover up. 
I added my flower and ribbons to the top and placed it on a stand. Super happy and love the bright spring colors.


Thanks for stopping by today! 

Sunday, January 13, 2019

Love String Art

Hello Everyone! I'm sharing a new technique (for me) for my Miss Kate Cuttables design team project. I will share step by step directions. 

For my project I tried STRING ART!

I am going to share the steps I took to create the project:

STEP 1: 
I selected the SVGs. I used the envelope from the Valentine Love Letter Set.

I also used a bold font for the LOVE. You can use the bottom layer of the Valentine Uppercase Alphabet. Once I imported the SVGs into my Cameo Software I converted to dots using the rhinestone feature. I converted the lines to dots. I used .25 spacing.


STEP 2:
I cut vinyl with my Cameo. When I peeled the vinyl from the backer it left all the dots on the backer piece so it was super easy and there was no weeding needed. I applied the vinyl to my board and grabbed by hammer and nails.


STEP 3: 
I nailed in my nails. Using the holes in vinyl as my guide. 

I peeled off the vinyl when I was done nailing.

STEP 4:
I grabbed my yarn (Walmart carries this brand)

I started by securing my yarn on a corner nail and double knotting it, leave a tail. I then went around the outside edge of the design, wrappng around each nail, sort of outlining it, keeping the yarn at the bottom of nail. Once it was outlined I started randomly wrapping the yarn until it was a desired amount of coverage.
Once it was completed I repeated the outline around the shape to finish it off and tied a knot at the nail I started on.

I decided to outline my envelope with black yarn - it helped to make it pop.


This project is time consuming but it was very fun! 
I actually took some iphone videos. Here are the links on YouTube:


Thanks for stopping by today!


Monday, December 17, 2018

Dasher, Dancer, Prancer...

Howdy! It's almost Christmas and I got a bit of craftiness in this weekend. It's my turn on the Miss Kate Cuttables Blog today.

Here's a festive 11x24 sign I created for my design team project: 


I also used the Flying Reindeer Set.

Here's my step by step process:
1. First I stained my board and dry brushed over the stain once it was dry

2. Next I cut the file on my Cameo out of vinyl. I weeded out the letters I wanted to paint, applied transfer tape and transferred it to the board.

3. Next I applied chalk paint.

4. Lastly I removed the vinyl.


Hope you enjoyed my project today! Merry Christmas!!

Monday, November 19, 2018

Merry Christmas Sign

Hello - It's almost Thanksgiving and right around the corner we'll soon be celebrating Christmas! For my Miss Kate Cuttables Design Team Project I created a wooden sign.

Before we check out my project make sure you download the Freebie of the day!

For my project I used a wood sign I picked up at Target on clearance after last Christmas. It's called a charger.


I initially was going to use the vinyl as a stencil and apply chalk paint but I really liked how the white vinyl looked on the sign.

I used the Merry Christmas SVG. You can grab it here!


I made some fun signs last year on the same charger blanks. 

Thanks for stopping by today!

Monday, January 9, 2017

Miss Kate Jan Challenge

For this month's challenge at Miss Kate's the theme is Anything Goes! I recently took down all the Christmas stuff and thought I'd create a fun and colorful sign to bring on Spring!


I'm torn on this one - there is something about the color combo that's a little off but I'm going with it.

I cut the files on my Cameo using 631 Vinyl and applied to the menu board I got at Target. I got it after Christmas half off for $1.50. Gotta love a bargain! It's about 8x12.


I then applied the acrylic paints sparingly with foam brushes. Before it dried completely I removed the vinyl to reveal my sign. After everything dried I sanded the edges and even ran the sand paper over the painted areas.


Here are the details on the Miss Kate Files:
I used the file Bring on Spring Title.
I did not use all the little pieces of grass and the water since I stenciled.


I added birdie at the bottom. It's the Lovebird on a Branch file. 
It was a simple file that works well with stenciling.

Hope you can join in on the Anything Goes Challenge on the Miss Kate Facebook Page!
Don't forget to stop over to check out the other design team projects.


Sunday, January 8, 2017

Let It Snow!

Hello Everyone. I'm sharing over on the Miss Kate blog today. :) 

I have been into a sign kick lately. I initially picked up a 4' wide x 2' high piece of plywood about a year ago with intentions on creating a sign. I finally got it out and stained it.

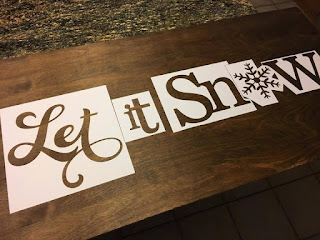
For my sign I used the Miss Kate Let it Snow Title.
 I rearranged the wording and simplified the design by removing some of the snowflakes. 
I then cut a stencil from 631 Vinyl and applied to the board.

I masked off the board with scrap paper.
 

I then spray painted with an indoor/outdoor paint. It dried in a matter of minutes!
I removed all the paper and vinyl and here is my sign:

Looking good so far, right? 
Well I decided to get out my power tools and drill holes around the edge so I can insert lights.

Here is my final sign in action! 


If you notice on my window above the door I also added snowflakes to the window and if you were to come into my house you will so those vinyl snowflakes on just about everything from bathroom mirrors to hurricane lamps. 

Even though I took down the tree and put away some of the decorations I moved my sign indoors to enjoy for a few more weeks.

Thanks for stopping by today!

SaveSave

Friday, December 23, 2016

Miss Kate Christmas Signs

Are you ready for Christmas and have you had some time to craft?
I am ready and I did do some crafting this year. I am totally addicted to making these holiday signs.
I'm sharing these on the Miss Kate Blog Today!

I picked up the bases at Target in the Dollar Spot for $3. They are chargers. I have been seeing them all over Facebook in some of the groups I belong to since early November and every time I went to Target I checked for them with no luck. One day in mid December I went in and spotted them! I was so excited and bought a dozen of them.
I am so glad I did - I have been having so much fun creating these signs.


Here are my steps...
I select the Miss Kate file I want to use and add personalized copy

Cut 631 vinyl (not permanent type) on my Cameo

Weed out the areas I want to paint and transfer to board using contact paper. 

I then do a dry brush technique, sometimes 1 coat, other times 2, depending on the looking I'm going for. 

Let partially dry and peel off vinyl.
(If you wait until it completely dries it may bleed) 

That's it. I made these for a friend and my nieces. They all loved them!
Here are images of each design and I will list the Miss Kate file under each.
Birch Trees with Deer

'Tis the Season Phrase

Believe

Tis The Season Phrase

I also created this table runner for Christmas.


I cut the little bow on my cameo and stitched around it to secure it.


You can get the table runner free tutorial here on Julie Cefalu's blog.
It is really easy to follow along with great instructions and visuals!

Wishing you all a Happy Holiday!