Showing posts with label Designer Edition. Show all posts

Sunday, August 13, 2017

Back to School Layout

Hello! I'm sharing over on the Miss Kate Cuttables Blog today.


I recently went on a scrapbook weekend away and worked on this Back to School Layout:


I just love how this paper pieced owl turned out.
You can get the file here. Forest Owl


Here's a closeup of my First Day of School title:


If you have any kiddos going to back school hope I inspired you for your next layout!

Sunday, December 11, 2016

Gatefold Birthday Cards

Hello Everyone - It's my turn on the Miss Kate's Blog. I like to give handcrafted Birthday Cards throughout the year. I like to create a bunch at a time so I have them whenever I need them.

I use the Print and Cut method on my Cameo for the cards. I first select all the elements and open them in the Cameo Designer Edition software. I print this out and include the registration marks.


I then trace the elements and do an offset. (This is indicated with the red outline on the image below.) I place the paper on my mat, detect registration marks and then select the outline areas and indicate those to cut.


Here are my cards:
These are both gatefold cards and I'm sharing the outside and inside views.
The flat card is 10" wide x 7" high and each fold comes in 2.5" from the edges.

I used the following Miss Kate files:


Thanks for stopping by today. Hope this gives you some inspiration to get some Birthday Cards completed for 2017!

Sunday, October 9, 2016

Fancy Frame Shadowbox


Hello! I love creating shadowboxes for newlyweds. It makes a perfect wedding gift.
I have made a bunch of these and usually use a bracket style file. I was in the mood to try something new on this one.

After searching Flourishes/Frames Category on the Miss Kate website I spotted these Fancy Frames.


I used the one on the top left. I usually do not stretch files but in the case I wanted it a bit wider and when I did stretch in the Cameo Designer Edition Software it looked just fine. I did create a shadow of the pattern and also cut the bottom layer in white. Foam tape and foam core under the layers helps add dimension and give the shadow effect. I also added some pearl accents.


Hope you enjoyed my project! Stop back in a few days to check out the Miss Kate's October Challenge.

Sunday, May 8, 2016

MKC - Summer Camp Layout

HAPPY MOTHER'S DAY!
(and Happy National Scrapbook Day, a day late)

Hi and welcome to my blog. It's my turn on the Miss Kate Cuttable's Blog. I just love Miss Kate files for my scrapbook layouts. The titles and paper piecings are so easy to put together.

Here is my layout
(click on it to see it enlarged)


I used the Compass from the Camping Set.
I used the pen tool for the arrow and letters.

You can find this cool Tent here.
I made the colors match the tents on the camp site.

The trees on the right are two from Set of Trees.
I switched up the title a bit. I used the "CAMPER" from the Happy Campers Title
I took just the CAMPER portion and created an offset in my designer edition software for the Cameo.


Thanks for stopping by today. Hope you find some time to craft this weekend!


Friday, June 12, 2015

Wedding Theme Challenge

Hello - It’s June and Wedding time. Miss Kate Cuttables is having Wedding Theme Challenge. 
I made this wedding card for a recent wedding I went to.


I used the All You Need Is Love Phrase from Miss Kate Cuttables.


I took the file and duplicated it and used the offset in the Silhouette Designer Edition Software.
I cut the offset to help with the type placement when paper piecing.


I cut the all and the is along with the hearts from a silver adhesive stock. 
It was so easy and convenient to cut and adhere.


Head on over to the Miss Kate Cuttables Galleria Facebook Page to enter the challenge!


Sunday, April 12, 2015

Spring Table Runner

Well I have a lot of "Firsts" to share with you today. 
I'm sharing a Spring Table Runner today - it’s the first project I created with fabric I cut on my Silhouette Cameo. 
It’s also my first table runner. I've only used my sewing machine to sew on scrapbook layouts.


I used Miss Kate Cuttable files and cut the SVGs on my Cameo. Check out all the details here.

Here is where the other "first" comes into play...I created my first how to video.
Let’s just say it was a learning experience and I have some ideas on how to improve future videos.
Please check it out and let me know what you think!


Here are a few other photos of my table runner.
If you are an expert seamstress and have any tips - Please leave me a comment!


 Please stop over to the Miss Kate Cuttables Blog and don’t forget to grab the freebie of the day!
Thanks for stopping by today.


Sunday, January 11, 2015

Let It Snow Banner

Today I'm very excited to share my first Miss Kate Cuttables design team project! 
I'm honored to the join the awesome designers and can't wait to share projects with Miss Kate Cuttables wonderful files.

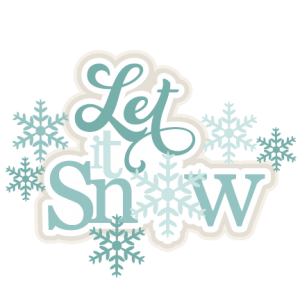
I always get bummed when I take down all the Christmas decorations so I made a Let It Snow Banner to dress up my home.

Here is a look at the banner: (click to enlarge)


I started out by importing the Tags and Backgrounds svg into the Designer Edition software. 
I ungrouped and deleted the other images and released compound path and deleted the hole of the tag. 
I enlarged to 4.5" wide and cut from Carta Bella - All Bundled Up patterned paper.
Next I cut the snowflake with the swirl for the top of each banner. It is from the Snowflake Set file.
I also cut out the snowflakes from the same set. I added 3.5" circle behind each to make them pop against the chevron paper.
I used silver glitter paper (cut 2X with the cameo) and also inked papers with silver to create a cohesive look.
I wanted to feature the Let It Snow Title on the center banner.
The ends of the banner feature the Cute Mittens File. I cut the image down the middle and applied to the banner.

 Tips: 
I added gems to accent, finished off with grommets, added ribbon to connect and also to accent, used foam tape throughout to add dimension, kept the design symmetric.

Here's a close up look at each panel of the banner.


Stop by the MKC Blog to follow and make sure you get the Freebie of the Day!

Thanks for stopping by and if you decide to make a winter banner to dress up your home please share on the Miss Kate Cuttables Galleria on Facebook.