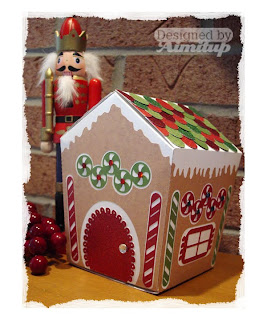
I went out to lunch the other day and spotted this cool box that resembled a house. I asked the waiter for one and brought it home. I put it on my scanner, traced in Illustrator, designed the color layers in Illustrator, cut on my Expression and assembled.
Here it is! My first 3-D type project:
Here is a step by step tutorial on the project. Please note: I am on a Mac so these are saved in SCAL 1. I've included width and height measurements incase you'd like to play with the svg files and customize before cutting.
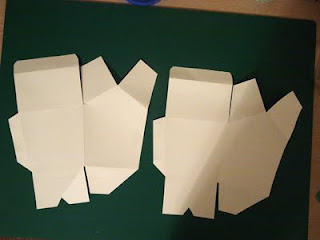
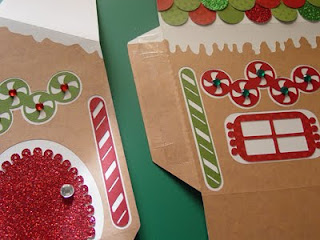
STEP 1 - Cut "GingerBrdHouse_White.svg" 2 times (white cardstock). w: 10.867 h :11.350 If you are new to SCAL and cutting the dashed lines will help in folding the piece.
STEP 2 - Cut "GingerBrdHouse_Brown.svg" 2 times w: 10.100 h: 8.598 Adhere brown stock to white.
STEP 3 - Cut "GingerBrdHouse_RoofTiles.svg" w: 8.676 h: 10.878. I put some separation between the circles so you can do 5 different strips of color on your mat. You will need 78 circles - if you cut as is you'll get 100 for some extras. Layer these circles as shown in the photos below. Add a pencil line to help align straight. This is the time consuming part but well worth it.
Trim off the circles that overlay the edge.
STEP 4 - Cut "GingerBrdHouse_Green.svg" 2 times (or copy and paste) w: 5.855 h: 3.028 and adhere to house.
STEP 5 - Cut "GingerBrdHouse_Red.svg" 2 times (or copy and paste) w: 7.700 h: 3.897 and adhere to house. I did not have enough red glitter stock so I cut one set using glitter paper and one using Bo Bunny Dots paper. Add some embellishments. I used Creative Charms gradient jewels and a brad for the door knob.
STEP 6 - Adhere two house pieces together using double stick tape.
Final flat view.
STEP 7 - Fold in the small top flaps first and then tuck in the other flaps.
View from the top.
STEP 8 - Fold in the small bottom flaps in and then fold in the interlocking flaps. You can add some double stick tape to the panels.
STEP 9 - One design flaw...your brown edges near the fold may be lifting a bit. Just use a glue pen to get under there and adhere.
Here is an inside view of the final product. A pair of gloves and a gingerbread ornament fit nicely. This would also be great for cookies or some homemade candy. I plan to cut out some plain boxes for my boys and let them decorate.
For the SVGs please click here to DOWNLOAD.
For the SCUT files please click here to DOWNLOAD.
Would love to see your house if you decide to create this!
Sunday, November 29, 2009
Gingerbread House Gift Box
Labels:
Box,
Christmas,
Creative Charms,
Gingerbread,
SVG,
Tutorial
Printing Journaling on a Diecut Shape
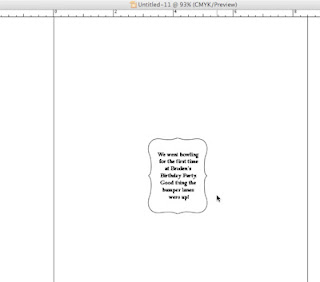
Someone on the Craft Edge Forum asked about journaling on a diecut shape and I suggesting running the diecut shape through the printer. I tried to put it into words but thought doing a visual tutorial would work better. Here are the steps:
STEP 1 - Cut the diecut shape on the Cricut.
STEP 2 - Create your type on your computer. In some programs you can even import an outline of the diecut shape so you can get the type to the right size.
STEP 3 - Printout the type and make sure it fits on the diecut shape.
STEP 4 - Positon the shape ontop of the printout. Tip: hold it up to a window or use a lightbox so you can see thru the diecut shape. Tape the diecut to the paper. I just one piece of tape to secure it.
STEP 5 - Run the paper back thru the printer and print the type again.
Final Product:
Hope that works for you!
Labels:
Tutorial
Friday, November 27, 2009
Baby Name Collages
Hope you had a great Thanksgiving!
Here are some recent baby name collages that I created. I use a 21 x 9 shadowbox frame and layer all the elements. The collages are designed to match the baby's room. I used elements from 3D Mums and Fall Flowers SVGCuts.com to cut for these. Love SVG Cuts - would highly recommend that you check out their site.
Here is closeup view to see the layering, details:
Here is another example. I leave an area on the right to insert a photo of the baby.
I've done a bunch of these for family & friends. I gave the one to my niece for her shower and she loved it - can't wait to see how it looks on the baby-to-be's room!
Labels:
Baby Name Collages,
SVGCuts
Wednesday, November 25, 2009
Baby Shower Invite
Here is a baby shower invite I created using the Cricut and SCAL. I cut the baby in circles using different color stock and glued those to the brown stock. I printed out the information and attached to the white stock. Inserted a ribbon and it was complete.
Here are the elements in SVG format.
For the BABY letters in the circles click here to DOWNLOAD.
For the back and front sections of the invite click here to DOWNLOAD.
Please Note: If you size your back section to 4.25" wide x 5.5" high it fits perfect in a standard invitation envelope that your local office supply store will carry.
My niece was thrilled with these! Hope you give it a try!
Labels:
Baby Name Collages,
Invitations,
SVG
Monday, November 23, 2009
In Their Words
My boys have some fantastic quotes and questions and wanted to capture them on this layout. I'm on the design team for a local scrapbook store called the Crop Shop and the challenge was to use Core'dinations Chocolate Paper. I really liked how sanding the embossed elements look with paper but I do not have an embossing gadget. I remember doing hand embossing in art school, did a test and worked like a charm!
Here is my final layout:
Here is the quote SVG if you'd like to give this a try. Click here to DOWNLOAD.
Here is tutorial on how I did the hand embossing:
STEP 1: After you create your image in Illustrator select art and choose reflect tool. (Please note - do not do real detailed art - keep it on the simple side)
STEP 2: Select Vertical Reflect and Copy.
STEP 3: Print the reflected art out on your printer.
STEP 4: Cut the original art out on the Cricut using chip board. (I use cereal boxes - and set cutter to 3X in SCAL)
STEP 5: Attach chip board to the right side of the paper (the side you want to "pop out"). Place in the corner for easy positioning & tape in place.
STEP 6: Trim the mirror image that you printed out to size.
STEP 7: Turn paper over and attach mirror image to same corner. This printout is just a guide to show you where you need to emboss.
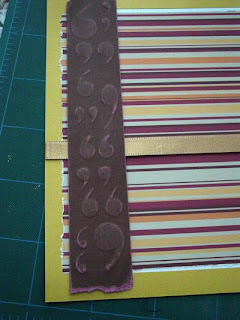
STEP 8: I just used a pen without the point. Using your printout as a guide you have to feel for the edges of chipboard and trace around and also emboss on the inside of the object. Press hard but don't tear thru.
STEP 9: This is how it should look from the bottom side of the paper.
STEP 10: This is the final embossed panel. I tore the top and bottom and sanded on my embossed areas to reveal the core color.
This paper is awesome. I also used it for the title and frames around the quotes and printed the quotes out on the back of the paper. Please let me know what you think of the tutorial, hope you give it a try!
Saturday, November 21, 2009
Second Valentine's Layout
This second Valentines layout is more fun and whimsical.
I used Bo Bunny Dots with Red and White Card Stock for the titles. I added some stitching and inking. The brads on this layout were great.
I had alot of Creative Charms embellishments on this layout and the only thing I cut was the title:
Click here to DOWNLOAD.
These kits were so fun, thanks for taking a look!
Check back tomorrow for a layout featuring hand-embossing and Core'dinations paper. I will give you step by step directions on how to hand emboss your paper.
Labels:
Creative Charms,
Layout,
SVG,
Valentines
First Valentine's Layout
If you are like me you may be playing catch up with your scrapbooking. Maybe still doing Valentine's Day 2008 or 2009? I created this layout using a Creative Charms 2010 Valentine's Kit.
I used Core'dinations Whitewash, Stemma Something Sweet and Red Cardstock for this layout. I added the Pearl Stickers to the Pure Blossoms and sanded the Core'dinations paper. I loved the Pearl Stickers on this layout - I used them throughout and they really added a special touch to the layout.
Interested in the SVG for the heart that I cut for this layout?
Click here to DOWNLOAD.
Check back tomorrow for another layout and SVG.
Labels:
Creative Charms,
Layout,
SVG,
Valentines
More Christmas Ornaments
Here are two ornaments I created using Creative Charms products. There is an area to insert a photo. The metallic stock is Gemstones Blue Topaz. I also used an ivory ribbon & card stock. I used a simple frame SVG from my stash to cut the ornament in SCAL.
This fun tag-type ornament also features Creative Charms products. The patterned paper is Bo Bunny. I stamped the Dear Santa and wish list using red inks. I finished it off with some ribbon on the ring. Once again this is a frame from my stash that I cut using SCAL.
I hope you like them. Thanks for stopping by!
Labels:
Christmas,
Creative Charms,
Ornament
Subscribe to:
Posts (Atom)