Monday, February 15, 2016

Tulip Box Card

Hello Everyone! If you follow along you saw the box card I created on my last post. 

I purchased the Springtime Box Card SVG KIt from SVG Cuts and have to say I'm officially hooked on box cards!
Here is a look at the box card in the envelope.


When you pull out the card it is flat and here's how it looks.


Now for the big reveal....It pops open and WOW a 3D card.
(Even my boys and husband were impressed by this one...lol)


Here's a few more looks - looking down and the back. I used the pen tool to add a Birthday Message.


I switched up Mary at SVG Cut's card a bit. It was originally designed to have all the tulips at the same level.


I staggered them. Thought I'd share how I did it in the Silhouette Designer Edition Software.

STEP 1 - Open the SVG files for the 1st and 2nd set of tulips.

STEP 2 - Draw boxes to remove some of the stems - see red boxes highlighted below.

STEP 3 - Select Subtract under the Modify menu. It will delete the area you selected.

STEP 4 - Move the tulips and stems down to overlap the bottom strips.

STEP 5 - I outlined the images to show you how if you were to cut them now it would cut them separately.
Here is the tricky part....1) Select the bottom strips and hit ungroup. Select just the strip and the flowers/stems above it and select Weld.
(If you select the entire thing the numbers and fold marks would disappear) 

STEP 6 - If you select Cut Line Settings and select "Cut" this is how it should appear.
You are now ready to cut!


Hope you liked my box card and the tutorial. 
If you have any questions about the tutorial please leave me a comment or send me an email at am220099@gmail.com.

Saturday, February 13, 2016

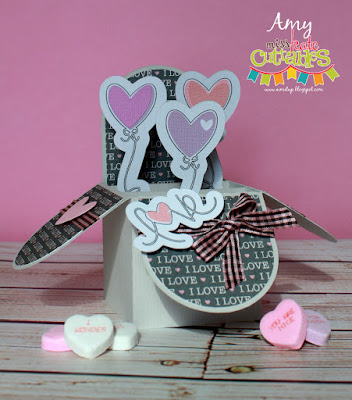
Love Box Card


Happy Valentine's Day to you! I created this fun box card today and wanted to share with you.
I was inspired by three different people on this project.

First Cindy Ruffino created a box card using Miss Kate Cuttables files - Second Melissa De Monic created the card with the heart balloons using the pen tool:


Last But Not Least - Mary from SVG Cuts created these new Springtime Box Cards SVG Kit. I purchased the Kit and watched the Assembly Video. I thought ....I'm going to try and make my own Valentine box card before I make Mary's Spring versions.


Thanks ladies for the inspiration!


I added the Heart Balloons & Love Word Set from Miss Kate Cuttables.
As I mentioned earlier I used my pen tool for the outline and added the cut outs of the hearts. 

As you can see the amazing part of a box card is they fold flat and once the recipient removes them from the envelope >>>
BAM! it is a 3D Card.


I also used my pen toll to create the messaging on the back of the card. 
(She is going to love it and so will our other Grandma!)


Happy Valentine's Day!

p.s. if you want to pick up SVG Cut's latest Springtime Box Cards SVG Kit
Just click away.


Tuesday, February 9, 2016

Love Challenge

It's time for another challenge over on the Miss Kate Cuttable’s Galleria Facebook Page.

The theme is 'LOVE"

I made some fun treat containers.


I started out with plastic containers which hold the drink pouches.


I initially tried to adhere scrapbook paper to the containers but it did not work so well. I had some vinyl which did not cut very well on Cameo. I tried it and it worked perfect!


I added white vinyl hearts over the prink vinyl and added tags.
They are made from the Bee Mine Title file from Miss Kate Cuttables. 


I cut them on my Cameo and paper pieced them together.


Fill the containers with Valentine Treats and a gift card and you'll be good to go!

Stop by the MKC blog to see the Design team projects and join the challenge over on the FB Galleria Page.

Miss Kate Cuttable's Store is having a sale on all Valentine SVGs - check them out!


Sunday, February 7, 2016

Superhero Baby Shower

Hello Everyone. I'm up on the Miss Kate Cuttable's Blog and sharing my Superhero Shadowbox. 


Stop by the MKC Blog for my project details.

I made this for my coworker who is expecting her own little superhero. She decorated the baby's room in a superhero theme. She also carried the theme into her baby shower.

Here's a look at the shower:

The room was festive with bright colors and superhero balloons


Prize for games


These cupcakes were delicious and the rings worked in the theme perfectly


We of course had cookies


Lollipops with capes made out felt ~ so creative


Checking out the collage I made :)


Here's the super cute Mom to be - check out her superhero outfit!


Thanks for stopping by today ~ hope this Superhero Themed Baby Shower inspired you.